We’ve all seen them: jaw-dropping photos that make us stop and stare. These photos come in many compositions and kinds, and they’re not all stunning simply because a professional photographer took them. In fact, many such images were taken by amateurs, and they’re jaw-dropping because of what they showcase, not just the how. Great summer camp photography is all about technique, not expertise.
The best camp photos capture the joy and authenticity of summer camp. They are candid shots that show friendship and happiness. They’re great because the moment behind them is so great. They’re beautifully-colored, well-cropped images that capture memories and keep them close for years to come.
So, what makes these photos so great, and how can you take more of them? Here’s what you need to know.
Getting Started: 8 Photography Terms You Should Know
If you’re a burgeoning photographer, you will find a few ‘insider’ tips helpful. Following are a few photography terms/skills that you’ll likely use:
- Aperture. Aperture is the size of the opening behind your lens. It’s important because an open aperture floods the image with light, creating a brighter final product. Aperture is segmented into f-stops: the smaller the f-stop, the wider the opening.
- Aspect Ratio. Aspect ratio is the ratio of height to width in an image. An 8 x 10 has an equal aspect ratio to a 4 x 5, but a 4 x 7 image is a bit wider. This matters if you want to print your images after you’ve taken them. Or if you’re trying to optimize a photo for a streaming photo album where you want all the photos to be the same ‘aspect’ for continuity.
- Burst Mode. This will quickly become every camp photographer’s best friend. Ideal for action settings or those where you want to catch every phase of something (a camper jumping into the lake, for example, or a baseball pitch), burst mode allows you to snap lots of consecutive pictures almost immediately. All you have to do is turn burst mode on and hold the button down.
- Depth of Field. Depth of field is an important photography term that refers to how much of your image is in sharp focus. Even if you focus your camera on a single distance, there’s distance in front of and behind the subject that remains sharp. This is your depth of field. For best results, portraits should have a shallow depth of field, blurring the background and calling the subject into focus. Landscapes should have a large depth of field, creating a sharp image even at distance. Experiment in advance using different focal lengths to get a feel for how your camera(s) capture the imagery and be able to quickly size up a photo opportunity.
- Exposure. Exposure is the level of light in an image. An under-exposed picture is dark, while an overexposed one is too bright. You can control your exposure through settings like aperture and shutter speed.
- ISO. Your ISO setting determines how much light your camera can pick up with your summer camp photography. An ISO of 100 means a camera won’t be very sensitive to light, which is great for bright, daytime shots. A higher ISO, meanwhile, allows more light into the image, and is excellent for evening or low-light pictures.
- Shutter Speed. Shutter speed is the metric that determines how long a camera shutter (the part that mechanically opens and closes to create images) stays open. The longer a shutter remains open, the more light it allows through.
- White Balance. White balance is an important term to understand. Because cameras can’t adjust to different light sources automatically, they sometimes produce images that look too yellow or too blue. This is because the white balance is off. Fortunately, you can fix this by adjusting the white balance manually, according to what kind of light you’re shooting in.
The 5 Fundamentals of a Great Camp Photo
Like great stories have essential elements, so, too, do great photos. Here are a few crucial pillars for any excellent image:
1. Light
Light is critical because – well – it’s what makes photos. Light defines the mood of the picture, shows off its subjects, and throws images into contrast. It’s an essential part of any enjoyable image.
Whether it’s natural or artificial light, the quality and direction of it are important. Bright, vibrant, sunny photos capture perfect days at camp while darker, sunset images capture those quiet evenings around the campfire. Play with your white balance, ISO, shutter speed, and aperture settings to produce different effects with light.
2. Color
The color of an image is almost as important as the light within it. Color, like light, works to set the mood of an image and goes a long way toward helping the viewer connect emotionally with the photo.
For example, a photo with lots of blacks and browns may feel gloomy or mysterious, while an image with lots of punchy blues and yellow may feel joyful and exciting. Color is a significant factor in the overall feel of a photograph.
3. Moment
The moment is what makes the photo. After all, a well-lit photo of a blue background wouldn’t evoke much, would it? Photos need subjects to come to life. Is the image of two children jumping off a dock? A camper riding a horse for the first time? That exact moment an arrow hits the bull’s eye? Every element of an image tells a story, and it’s important to understand how to compose pictures accordingly.
4. Composition
Most of us have heard about the “rule of thirds” in summer camp photography. According to Mastin Labs, “The rule of thirds is based on research that shows that images that are composed with the subject placed at specific points of a frame tend to be more appealing and interesting to the eye. The rule of thirds encourages photographers to leave interesting white space around an object, and to refrain from creating stiff, centered images.”
If you’re not already using the rule of thirds in your photos, here’s an easy way to balance your images: on your DSLR camera, enable the grid feature. Once you’ve done this, you’ll be able to look through the viewfinder and see a virtual grid superimposed over the image. Instead of placing the subject of your photo’s focus directly in the middle of the grid, place it off to one side – ideally within the left or right two-thirds of the image. This draws attention to the subject of your photo and makes for a more interesting composition.
You’ll also want to pay attention to additional compensation considerations, like depth, detail, and use of various framing techniques. These ensure that the image calls out what the photographer wants it to call out, and leaves unimportant information out of it.
5. Distance
The distance between the photographer and the subject is yet another critical element in the crafting of a great photo. Is the photographer up close and personal to the subject? Are they right in the action, or is it taking place at some distance? Something this simple can define whether the photo feels breathless and exciting or relaxing and peaceful.
8 Tips for Taking Better Photos for Your Summer Camp
Now that you know what makes camp photos great, how do you improve your camp photos, so they live up to the hype? Here are a few tried-and-true tips:
1. Focus on Focus
Focus is everything when it comes to camp photos. While a little tasteful blur can help communicate action and excitement, nobody likes out-of-focus, fuzzy photographs. Want an example? Take some inspiration from YMCA Camp Tecumseh, which is who we have to thank for this stunning image:
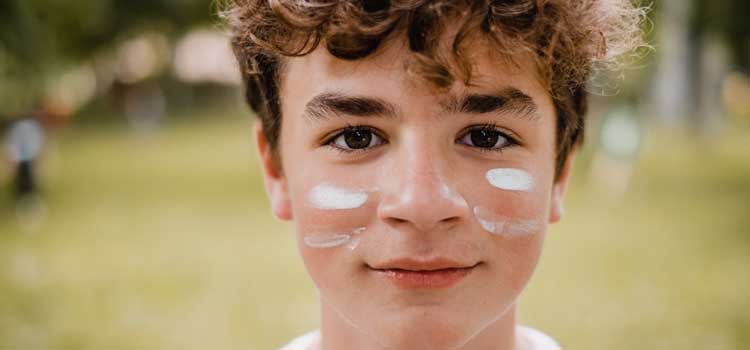
What makes this image so beautiful is the focus. The boy’s face is crisp and sharp and clear. You can lose yourself in every detail of this photo, from his summer-tousled hair to the smear of face paint on his cheeks. Everything behind him is out-of-focus because he is the moment of this photograph. If he and the background were both sharp and clear, you’d lose the single-pointedness of him.
While you won’t get the focus right on every picture, keeping it top-of-mind will help you craft beautiful, high-quality images from the get-go.
2. Limit Your Subjects
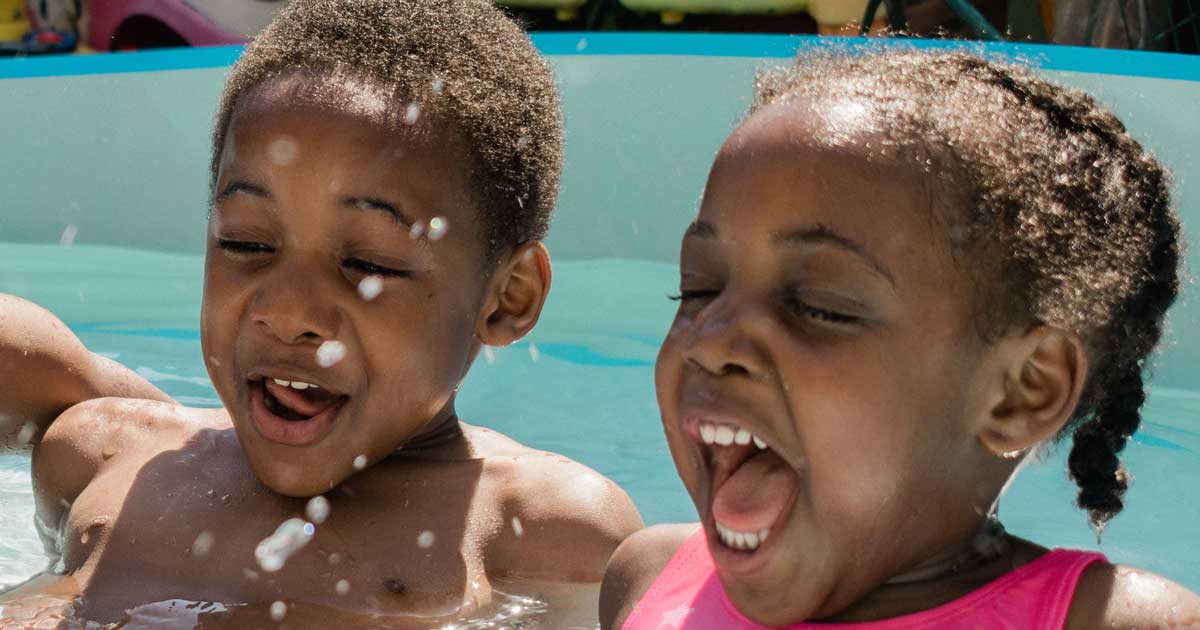
With summer camp photography, it’s easy to capture dozens of campers in any given photo. This makes it tough to draw focus to any of them, though. Instead, try to limit the subjects in your camp photos. Images of a handful of campers are often more impactful than pictures of hundreds of them. Take, for example, this additional image from YMCA Camp Tecumseh:
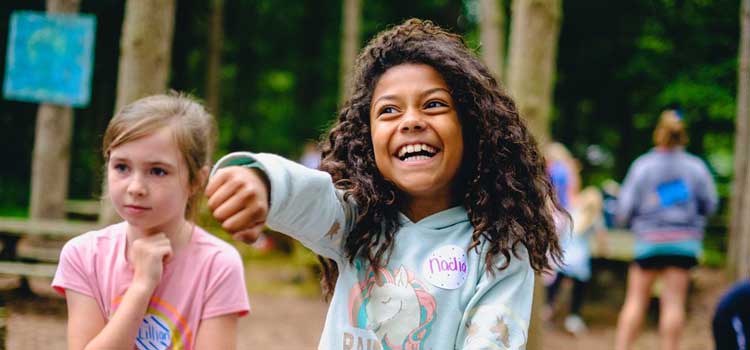
Because these two campers are the focus of this photo, you get to drink in their hair, their facial expressions, the vibrant pink of their outfits, and the deep green behind them. In an image like the one below, where there are many more campers in the picture, your attention changes:
While there’s no problem with taking photos with lots of subjects, it’s more impactful to limit your subjects to a handful whenever you can. Large group photos are great, but they don’t invite lots of inspection on the part of viewers.
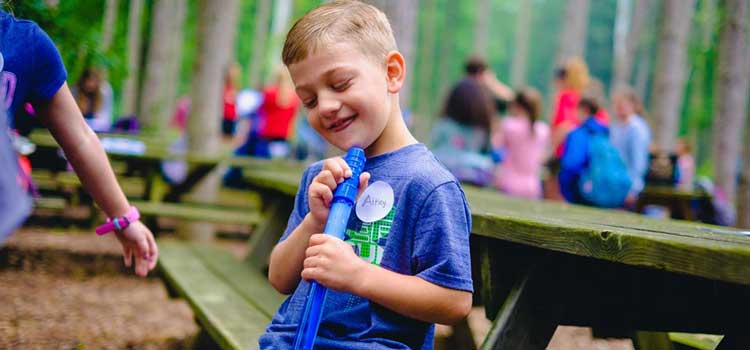
3. Take Your Time
Lots of camp photographers rush through the composition of their photos. The problem with this approach is that capturing excellent moments with the right balance, focus, light, and composition just can’t be rushed. While there’s something to be said about being quick on the draw, rushing a photo only makes it feel hasty.
Instead, take your time and set up the image correctly. Draw the subject into focus, think about the crop of the image (do you need to zoom in or out to limit “noise” and focus on the critical details?) and ask the subject to interact with you if you need a smile or a tilt of the head. That kind of investment is what creates joyful, outstanding images like the one below:
4. Understand Your “Must Take” Images
Part of being a better summer camp photographer is understanding the role various kinds of images play in your summer camp marketing. There are photos you don’t need to take, and photos you absolutely must take to sell and market your camp. Here are a few of the “must-take” images:
- Headshots of your staff
- Pictures of kids engaging with your programs and facilities
- Kids and counselors interacting together
- The start and end of a given camp day
- Campers and staff shots you can use for marketing
Having a rich library of these kinds of images will give you material to draw on for brochures, flyers, and additional material down the road. And it will bring your parents into the life of their kids at camp when they’re shared in a mobile app like Campanion or other online sharing platforms.
5. Try New Things
Once you’ve mastered the fundamentals, it’s time to get creative. Once you’ve started to shoot great camp photos reliably, branch out and try your hand at something new. The great thing about digital photography is that you can easily take dozens…even hundreds of photos as you experiment with different settings, environments, and shot techniques with no extra cost. You have a great eye…see what you can see when you look for those colors that pop unexpectedly, the parallel stories of nature and human interactions, the drama of an intimate portrait.
For example, could underwater summer camp photography work well? What about some nicely-shot camp videos? The sky’s the limit, and knowing how creative you can get will help you push your camp’s documentation to the next level.
If you need a bit of inspiration to get creative, look around at what your fellow camps are doing. They’ll likely have examples of compositions or types of photos you haven’t taken yet.
6. Stop Relying on Direct Sun
As we’ve discussed, light is important to great photographs. If you want yours to turn out, though, stop taking them in direct sunlight. Direct sunlight creates harsh lines of contrast, shadowy faces, and strange shading on images. Even the most youthful campers will look like they have harsh bags under their eyes in direct sunlight images.
Instead, ask your subjects to move slightly so they’re in shade or partial shade. This softens the images and does away with much of the harshness associated with direct sunlight. If you need additional light, you can use the flash on your camera or even add a reflector, for more staged shots.
7. Place Your Subject Off-Center
Part of what makes summer camp photos unique is that they capture an experience, a place, and a moment in time. And you can maximize this impact by simply thinking twice about how you arrange your subject. Instead of placing the subject in the middle of the frame, with nothing else around it, consider composing images that are intentionally off-center.
Consider this image, from YMCA Camp Tecumseh:
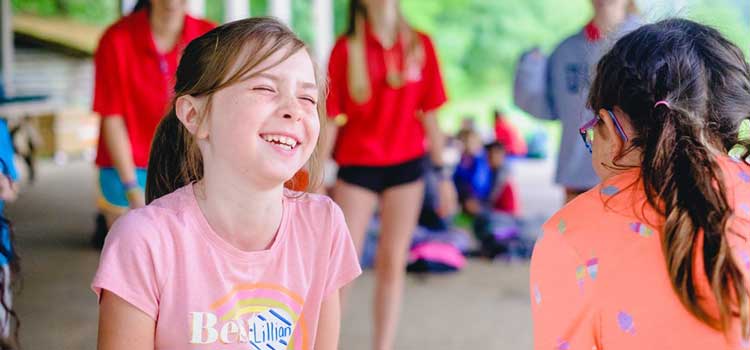
This image feels joyful because there’s so much happening within it. The girls are laughing, the counselors in the out-of-focus background beyond them are laughing, and the green of the camp’s landscape is vibrant and beautiful. And the colors of the pink, orange and red shirts all make the image come together to create a warm hue. It’s a much more exciting image than it would be if any single subject were just placed in the middle.
8. Edit Your Images Before you Share Them
If you’re using a photo-sharing tool like Campanion, edit your photos before you send them out. For most people who take summer camp photography seriously, an image isn’t “complete” once the shutter has been depressed. The best photos go through a careful editing process. During this process, evaluate the following in every image:
- Composition. Should the image be cropped, adjusted, or altered to provide better composition and focus?
- Light. Even if the image wasn’t shot in perfect light, you may be able to brighten it during the editing process.
- Color. Adjust the saturation levels on your image to create more vibrant or monochromatic photos.
- Red Eyes. Lots of modern photo editing tools have an automatic red eye fix. This allows you to get rid of those ghostly elements, even after the initial composition.
Depending on your preferences and the intended purposes of the photos, you may also choose to add your camp logo or watermark.
9. Play With Different Lenses
If you have a DSLR camera, you may want to buy a few lenses to go with it. Different lenses create different effects.
A 50 mm lens, for example, is an excellent portrait lens, as it has a shallow depth of field that will pull subjects into sharp focus, while blurring everything else for a soft, appealing background. A 24-35 mm lens, meanwhile, has the wide angle needed to create beautiful landscapes and a lens between 100-600 mm is great for zooming in on things off in the distance.
Pick up a few lenses and experiment with them to identify the ones that work best for you.
Your Summer Camp Photography Never Looked This Good
You don’t have to become a professional photographer to master the art of summer camp photography. Instead, simply employ these easy tricks. Whether you’re shooting burst images of your campers in a canoe race or stunning portraits to send out to parents, these smart tips will help you create truly beautiful images.
Once you’ve taken all these great shots, it’s time to invest in a platform to share them. Campanion offers automatic camper tagging, curated streams of “must see” daily images, and more. To learn about the app or request a demo, contact us today.